One of Samba's most complicated tasks lies in
reconciling the security models of Unix and Windows systems. Samba
must identify users by associating them with valid usernames and
groups, authenticate them by checking their passwords, then control
their access to resources by comparing their access rights to the
permissions on files and directories. These are complex topics on
their own, and it doesn't help that there are three
different operating system types to deal with (Unix, Windows
95/98/Me, and Windows NT/2000/XP) and that Samba supports multiple
methods of handling user authentication.
Users and Groups
Let's start
out as simply as possible and add support for a single user. The
easiest way to set up a client user is to create a Unix account (and
home directory) for that individual on the server and notify Samba of
the user's existence. You can do the latter by
creating a disk share that maps to the user's home
directory in the Samba configuration file and restricting access to
that user with the valid
users option. For example:
[dave]
        path = /home/dave
        comment = Dave's home directory
        writable = yes
        valid users = dave
The valid users option lists
the users allowed to access the share. In this case, only the user
dave is allowed to access the share. In some
situations it is possible to specify that any user can access a disk
share by using the guest ok
parameter. Because we don't wish to allow guest
access, that option is absent here. If you allow both authenticated
users and guest users access to the same share, you can make some
files accessible to guest users by assigning world-readable
permissions to those files while restricting access to other files to
particular users or groups.
When client users access a Samba share, they have to pass two levels
of restriction. Unix permissions on files and directories apply as
usual, and configuration parameters specified in the Samba
configuration file apply as well. In other words, a client must first
pass Samba's security mechanisms (e.g.,
authenticating with a valid username and password, passing the check
for the valid users parameter
and the read only parameter,
etc.), as well as the normal Unix file and directory permissions of
its Unix-side user, before it can gain read/write access to a share.
Remember that you can abbreviate the user's home
directory by using the %H variable. In addition, you can use the
Unix username variable %u and/or the client username variable
%U in your options as well. For
example :
[dave]
    comment = %U home directory
    writable = yes
    valid users = dave
    path = %H
With a single user accessing a home directory, access permissions are
taken care of when the user account is created. The home directory is
owned by the user, and permissions on it are set appropriately.
However, if you're creating a shared directory for
group access, you need to perform a few more steps.
Let's take a stab at a
group share for the
accounting department in the smb.conf file:
[accounting]
    comment = Accounting Department Directory
    writable = yes
    valid users = @account
    path = /home/samba/accounting
    create mode = 0660
    directory mode = 0770
The first thing we did differently is to specify
@account as the valid user instead of one or more
individual usernames. This is shorthand for saying that the valid
users are represented by the Unix group account.
These users will need to be added to the group entry
account in the
system group file (
/etc/group
or equivalent) to be recognized as part of the group. Once they are,
Samba will recognize those users as valid users for the share.
In addition, you need to create a shared directory that the members
of the group can access and point to it with the
path configuration option. Here are the Unix
commands that create the shared directory for the accounting
department (assuming /home/samba already
exists):
# mkdir /home/samba/accounting
# chgrp account /home/samba/accounting
# chmod 770 /home/samba/accounting
There are two other options in this smb.conf
example, both of which we saw in the previous chapter. These options
are create mode and
directory mode. These
options set the maximum file and directory permissions that a new
file or directory can have. In this case, we have denied all world
access to the contents of this share. (This is reinforced by the
chmod command, shown earlier.)
Handling Multiple Individual Users
Let's return
to user shares for a moment. If we have several users for whom to set
up home directory shares, we probably want to use the special
[homes] share that we introduced in Chapter 8. With the
[homes] share, all we need to say is:
[homes]
    browsable = no
    writable = yes
The [homes] share is a special section of the
Samba configuration file. If a user attempts to connect to an
ordinary share that doesn't appear in the
smb.conf file (such as specifying it with a UNC
in Windows Explorer), Samba will search for a
[homes] share. If one exists, the incoming share
name is assumed to be a username and is queried as such in the
password database ( /etc/passwd or equivalent)
file of the Samba server. If it appears, Samba assumes the client is
a Unix user trying to connect to his home directory.
As an illustration, let's assume that
sofia is attempting to connect to a share called
[sofia] on the Samba server. There is no share by
that name in the configuration file, but a [homes]
share exists and user sofia is present in the
password database, so Samba takes the following steps:
-
Samba creates a new disk share called [sofia] with
the path specified in the
[homes] section. If no path
option is specified in [homes], Samba initializes
it to her home directory.
-
Samba initializes the new share's options from the
defaults in [globals], as well as any overriding
options in [homes] with the exception of
browsable.
-
Samba connects sofia's client to
that share.
The [homes] share is a fast, painless way to
create shares for your user community without having to duplicate the
information from the password database file in the
smb.conf file. It does have some
peculiarities, however, that we need to
point out:
-
The [homes] section can represent any account on
the machine, which isn't always desirable. For
example, it can potentially create a share for
root, bin,
sys, uucp, and the like. You
can set a global
invalid users option
to protect against this.
-
The meaning of the
browsable configuration option is
different from other shares; it indicates only that a
[homes] section won't show up in
the local browse list, not that the [alice] share
won't. When the [alice] section
is created (after the initial connection), it will use the
browsable value from the
[globals] section for that share, not the value
from [homes].
As we mentioned, there is no need for a path statement in
[homes] if the users have Unix home directories in
the server's /etc/passwd file.
You should ensure that a valid home directory does exist, however, as
Samba will not automatically create a home directory for a user and
will refuse a tree connect if the user's directory
does not exist or is not accessible.
Controlling Access to Shares
Often you will need to restrict the users who
can access a specific share for security reasons. This is very easy
to do with Samba because it contains a wealth of options for creating
practically any security configuration. Let's
introduce a few configurations that you might want to use in your own
Samba setup.
We've seen what happens when you specify valid
users. However, you are also allowed to specify a list of
invalid users—users who should never be
allowed access to Samba or its shares. This is done with the
invalid users
option. We hinted at one frequent use of this option earlier: a
global default with the [homes] section to ensure
that various system users and superusers cannot be forged for access.
For example:
[global]
    invalid users = root bin daemon adm sync shutdown \
                        halt mail news uucp operator
    auto services = dave peter bob

[homes]
    browsable = no
    writable = yes
The invalid users option, like
valid users, can take group
names, preceded by an at sign (@), as well as
usernames. In the event that a user or group appears in both lists,
the invalid users option takes
precedence, and the user or group is denied access to the share.
At the other end of the spectrum, you can explicitly specify users
who will be allowed superuser (root) access to a share with
the admin users
option. An example follows:
[sales]
        path = /home/sales
        comment = Sedona Real Estate Sales Data
        writable = yes
        valid users = sofie shelby adilia
        admin users = mike
This option takes both group names and usernames. In addition, you
can specify NIS netgroups by preceding them with an
@ as well; if the netgroup is not found, Samba
will assume that you are referring to a standard Unix group.
Be careful if you assign administrative privileges to a share for an
entire group. The Samba Team highly recommends you avoid using this
option, as it essentially gives root access to the specified users or
groups for that share.
If you wish to force read-only or read/write access on users who
access a share, you can do so with the
read list and
write list options,
respectively. These options can be used on a per-share basis to
restrict a writable share or to grant write access to specific users
in a read-only share, respectively. For example:
[sales]
        path = /home/sales
        comment = Sedona Real Estate Sales Data
        read only = yes
        write list = sofie shelby
The write list option
cannot override Unix permissions. If you've created
the share without giving the write-list user write
permission on the Unix system, she will be denied write access
regardless of the setting of write
list.
Guest Access
As mentioned
earlier, you can configure a share using
guest ok
= yes to allow access to guest
users. This works only when using share-level security, which we will
cover later in this chapter. When a user connects as a guest,
authenticating with a username and password is unnecessary, but Samba
still needs a way to map the connected client to a user on the local
system. The guest
account parameter can be used in the share to
specify the Unix account that guest users should be assigned when
connecting to the Samba server. The default value for this is set
during compilation and is typically nobody, which
works well with most Unix versions. However, on some systems the
nobody account is not allowed to access some
services (e.g., printing), and you might need to set the guest user
to ftp or some other account instead.
If you wish to restrict access in a share only to guests—in
other words, all clients connect as the guest account when accessing
the share—you can use the guest
only option in conjunction with the
guest ok option, as shown in
the following example:
[sales]
        path = /home/sales
        comment = Sedona Real Estate Sales Data
        writable = yes
        guest ok = yes
        guest account = ftp
        guest only = yes
Make sure you specify yes for both
guest only and
guest ok; otherwise, Samba will
not use the guest account that you specify.
Access Control Options
Table 9-1 summarizes the options that you can use
to control access to shares.
Table 9-1. Share-level access options
|
Option
|
Parameters
|
Function
|
Default
|
Scope
|
|
admin users
|
string (list of usernames)
|
Users who can perform operations as root
|
None
|
Share
|
|
valid users
|
string (list of usernames)
|
Users who can connect to a share
|
None
|
Share
|
|
invalid users
|
string (list of usernames)
|
Users who will be denied access to a share
|
None
|
Share
|
|
read list
|
string (list of usernames)
|
Users who have read-only access to a writable share
|
None
|
Share
|
|
write list
|
string (list of usernames)
|
Users who have read/write access to a read-only share
|
None
|
Share
|
|
max connections
|
numeric
|
Maximum number of connections for a share at a given time
|
0
|
Share
|
|
guest only (only guest)
|
Boolean
|
If yes, allows only guest access
|
no
|
Share
|
|
guest account
|
string (name of account)
|
Unix account that will be used for guest access
|
nobody
|
Share
|
admin users
This option specifies a list of users that perform file operations as
if they were root. This means that they can modify
or destroy any other user's files, regardless of the
permissions. Any files that they create will have root ownership and
will use the default group of the admin user. The
admin users option allows PC
users to act as administrators for particular shares. Be very careful
when using this option, and make sure good password and other
security policies are in place.
valid users, invalid users
These two options let you enumerate the users and groups who are
granted or denied access to a particular share. You can enter a list
of user and/or group names. If a name is prefixed by an at sign
(@), it is interpreted as a group name—with
NIS groups searched before Unix groups. If the name is prefixed by a
plus sign (+), it is interpreted as the name of a
Unix group, and NIS is not searched. If the name is prefixed by an
ampersand (&), it is interpreted as an NIS
group name rather than as a Unix group name. The plus sign and
ampersand can be used together to specify whether NIS or Unix groups
are searched first. For example:
[database]
    valid users = mary ellen sue &sales +marketing @dbadmin
    invalid users = gavin syd dana &techies +&helpdesk
In the valid users parameter,
users mary, ellen, and
sue are allowed access to the
[database] share, as are the members of the Unix
group marketing and NIS/Unix group
dbadmin. The invalid
users parameter denies access to the share by
users gavin, syd, and
dana, as well as members of the NIS group
techies and Unix/NIS group
helpdesk. In this last case, the list of Unix
groups is searched first for the helpdesk group,
and if it is not found there, the list of NIS groups is searched.
The important rule to remember with these options is that any name or
group in the invalid users list
will always be denied access, even if it is
included (in any form) in the valid
users list.
read list, write list
Like the valid users
and invalid
users options, this pair of options specifies
which users have read-only access to a writable share and read/write
access to a read-only share, respectively. The value of either
options is a list of users. The read
list parameter overrides any other Samba
permissions granted—as well as Unix file permissions on the
server system—to deny users write access.
The write
list parameter overrides other Samba permissions
to grant write access, but cannot grant write access if the user
lacks write permissions for the file on the Unix system. You can
specify NIS or Unix group names by prefixing the name with an at sign
(such as @users). Neither configuration option has
a default value associated with it.
max connections
This option specifies the maximum number of client connections that a
share can have at any given time. Any connections that are attempted
after the maximum is reached will be rejected. The default value is
0, which is a special case that allows an
unlimited number of connections. You can override it per share as
follows:
[accounting]
    max connections = 30
This option is useful in the event that you need to limit the number
of users who are accessing a licensed program or piece of data
concurrently.
guest only
This share-level option (also called only
guest) forces a connection to a share to be
performed with the user specified by the guest
account option. The share to which this is applied
must explicitly specify guest
ok = yes for
this option to be recognized by Samba. The default value for this
option is no.
guest account
This option specifies the name of the account to be used for guest
access to shares in Samba. The default for this option varies from
system to system, but it is often set to nobody.
Some default user accounts have trouble connecting as guest users. If
that occurs on your system, the Samba Team recommends using the
ftp account as the guest user.
Username Options
Table 9-2 shows two additional options that Samba
can use to correct for incompatibilities in usernames between Windows
and Unix.
Table 9-2. Username options
|
Option
|
Parameters
|
Function
|
Default
|
Scope
|
|
username map
|
string (filename)
|
Sets the name of the username mapping file
|
None
|
Global
|
|
username level
|
numeric
|
Indicates the number of capital letters to use when trying to match a
username
|
0
|
Global
|
username map
Client usernames on an SMB network can be relatively long (up to 255
characters), while usernames on a Unix network often cannot be longer
than eight characters. This means that an individual user can have
one username on a client and another (shorter) one on the Samba
server. You can get past this issue by
mapping a free-form client
username to a Unix username of eight or fewer characters. It is
placed in a standard text file, using a format that
we'll describe shortly. You can then specify the
pathname to Samba with the global username
map option. Be sure to restrict access to this
file; make the root user the file's owner and deny
write access to others (with octal permissions of 744 or 644).
Otherwise, an untrusted user with access to the file can easily map
his client username to the root user of the Samba server.
You can specify this option as follows:
[global]
    username map = /usr/local/samba/private/usermap.txt
Each entry in the username map file should be listed as follows: the
Unix username, followed by an equal sign (=),
followed by one or more whitespace-separated SMB client usernames.
Note that unless instructed otherwise (i.e., a guest connection),
Samba will expect both the client and the server user to have the
same password. You can also map NT groups to one or more specific
Unix groups using the @ sign. Here are some
examples:
jarwin = JosephArwin
manderso = MarkAnderson
users = @account
You can also use the asterisk to specify a wildcard that matches any
free-form client username as an entry in the username map file:
nobody = *
Comments can be placed in the file by starting the line with a hash
mark (#) or a semicolon (;).
Note that you can also use this file to redirect one Unix user to
another user. Be careful, though, as Samba and your client might not
notify the user that the mapping has been made and Samba might be
expecting a different password.
username level
SMB clients (such as Windows) will often send usernames in SMB
connection requests entirely in capital letters; in other words,
client usernames are not necessarily case-sensitive. On a Unix
server, however, usernames are case-sensitive:
the user ANDY is different from the user
andy. By default, Samba attacks this problem by
doing the following:
-
Checking for a user account with the exact name sent by the client
-
Testing the username in all lowercase letters
-
Testing the username in lowercase letters with only the first letter
capitalized
If you wish to have Samba attempt more combinations of upper- and
lowercase letters, you can use the username
level global configuration option. This option
takes an integer value that specifies how many letters in the
username should be capitalized when attempting to connect to a share.
You can specify this option as follows:
[global]
    username level = 3
In this case, Samba attempts all possible permutations of usernames
having three capital letters. The larger the number, the more
computations Samba has to perform to match the username, and the
longer the authentication will take.
Authentication of Clients
At
this point, we should discuss how Samba authenticates users. Each
user who attempts to connect to a share not allowing guest access
must provide a password to
make a successful connection. What
Samba does with that password—and consequently the strategy
Samba will use to handle user authentication—is the arena of
the security configuration option. Samba currently
supports four
security levels on its network:
share, user,
server, and domain.
- Share-level security
-
Each share in the workgroup has one or more passwords associated with
it. Anyone who knows a valid password for the share can access it.
- User-level security
-
Each share in the workgroup is configured to allow access from
certain users. With each initial tree connection, the Samba server
verifies users and their passwords to allow them access to the share.
- Server-level security
-
This is the same as user-level security, except that the Samba server
uses another server to validate users and their passwords before
granting access to the share.
- Domain-level security
-
Samba becomes a member of a Windows NT domain and uses one of the
domain's domain controllers—either the PDC or
a BDC—to perform authentication. Once authenticated, the user
is given a special token that allows her access to any share with
appropriate access rights. With this token, the domain controller
will not have to revalidate the user's password each
time she attempts to access another share within the domain. The
domain controller can be a Windows NT/2000 PDC or BDC, or Samba
acting as a Windows NT PDC.
Each security policy can be implemented with the global
security option, as shown in Table 9-3.
Table 9-3. Security option
|
Option
|
Parameters
|
Function
|
Default
|
Scope
|
|
security
|
domain, server,
share, or user
|
Indicates the type of security that the Samba server will use
|
user
|
Global
|
Share-Level Security
With share-level security, each share has one or more passwords
associated with it, with the client being authenticated when first
connecting to the share. This differs from the other modes of
security in that there are no restrictions as to whom can access a
share, as long as that individual knows the correct password. Shares
often have multiple passwords. For example, one password might grant
read-only access, while another might grant read/write access.
Security is maintained as long as unauthorized users do not discover
the password for a share to which they shouldn't
have access.
OS/2 and Windows 95/98/Me both support share-level security on their
resources. You can set up share-level security with Windows 95/98/Me
by first enabling share-level security using the Access Control tab
of the Network Control Panel dialog. Then select the
"Share-level access control" radio
button (which deselects the "User-level access
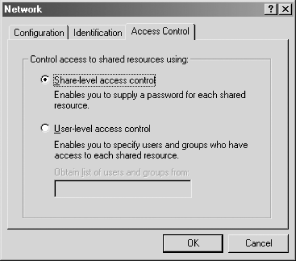
control" radio button), as shown in Figure 9-1, and click the OK button. Reboot as requested.
Figure 9-1. Selecting share-level security on a Windows 95/98/Me system
Next, right-click a resource—such as a hard drive or a
CD-ROM—and select the Properties menu item. This will bring up
the Resource Properties dialog box. Select the Sharing tab at the top
of the dialog box, and enable the resource as Shared As. From here,
you can configure how the shared resource will appear to individual
users, as well as assign whether the resource will appear as
read-only, read/write, or a mix, depending on the password that is
supplied.
You might be thinking that this security model is not a good fit for
Samba—and you would be right. In fact, if you set the
security =
share option in the Samba configuration file,
Samba will still reuse the username/password combinations in the
system password files to authenticate access. More precisely, Samba
will take the following steps when a client requests a connection
using share-level security:
-
When a connection is requested, Samba will accept the password and
(if sent) the username of the client.
-
If the share is guest only ,
the user is immediately granted access to the share with the rights
of the user specified by the guest
account parameter; no password checking is
performed.
-
For other shares, Samba appends the username to a list of users who
are allowed access to the share. It then attempts to validate the
password given in association with that username. If successful,
Samba grants the user access to the share with the rights assigned to
that user. The user will not need to authenticate again unless a
revalidate =
yes option has been set inside the share.
-
If the authentication is unsuccessful, Samba attempts to validate the
password against the list of users previously compiled during
attempted connections, as well as those specified under the share in
the configuration file. If the password matches that of any username
(as specified in the system password file, typically
/etc/passwd ), the user is granted access to the
share under that username.
-
However, if the share has a guest
ok or public option set, the
user will default to access with the rights of the user specified by
the guest account option.
You can indicate in the configuration file which users should be
initially placed on the share-level security user list by using the
username configuration option, as shown here:
[global]
    security = share

[accounting1]
    path = /home/samba/accounting1
    guest ok = no
    writable = yes
    username = davecb, pkelly, andyo
Here, when a user attempts to connect to a share, Samba verifies the
sent password against each user in its own list, in addition to the
passwords of users davecb,
pkelly, and andyo. If any of
the passwords match, the connection is verified, and the user is
allowed. Otherwise, connection to the specific share will fail.
Share-Level Security Options
Table 9-4 shows the options typically associated
with share-level
security.
Table 9-4. Share-level access options
|
Option
|
Parameters
|
Function
|
Default
|
Scope
|
|
only user
|
Boolean
|
If yes, usernames specified by
username are the only ones allowed
|
no
|
Share
|
|
username (user or
users)
|
string (list of usernames)
|
Users against which a client's password is tested
|
None
|
Share
|
only user
This Boolean option indicates whether Samba will allow connections to
a share using share-level security based solely on the individuals
specified in the username option, instead of those
users compiled on Samba's internal list. The default
value for this option is no. You can override it
per share as follows:
[global]
    security = share
[data]
    username = andy, peter, valerie
    only user = yes
username
This option presents a list of usernames and/or group names against
which Samba tests a connection password to allow access. It is
typically used with clients that have share-level security to allow
connections to a particular service based solely on a qualifying
password—in this case, one that matches a password set up for a
specific user:
[global]
    security = share
[data]
    username = andy, peter, terry
You can enter a list of usernames and/or group names. If a name is
prefixed by an at sign (@), it is interpreted as a
group name, with NIS groups searched before Unix groups. If the name
is prefixed by a plus sign (+), it is interpreted
as the name of a Unix group, and NIS is not searched. If the name is
prefixed by an ampersand (&), it is
interpreted as an NIS group name rather than a Unix group name. The
plus sign and ampersand can be used together to specify whether NIS
or Unix groups are searched first. When Samba encounters a group name
in this option, it attempts to authenticate each user in the group
until if finds one that succeeds. Beware that this can be very
inefficient.
We recommend against using this option unless you are implementing a
Samba server with share-level security.
User-Level Security
The default mode of security with Samba is user-level
security. With this method, each share is
assigned specific users that can access it. When a user requests a
connection to a share, Samba authenticates by validating the given
username and password with the authorized users in the configuration
file and the passwords in the password database of the Samba server.
As mentioned earlier in the chapter, one way to isolate which users
are allowed access to a specific share is by using the
valid users option for each
share:
[global]
    security = user

[accounting1]
    writable = yes
    valid users = bob, joe, sandy
Each user listed can connect to the share if the password provided
matches the password stored in the system password database on the
server. Once the initial authentication succeeds, the client will not
need to supply a password again to access that share unless the
revalidate =
yes option has been set.
Passwords can be sent to the Samba server in either an encrypted or a
nonencrypted format. If you have both types of systems on your
network, you should ensure that the passwords represented by each
user are stored both in a traditional account database and
Samba's encrypted password database. This way,
authorized users can gain access to their shares from any type of
client.[1] However, we recommend that you
move your system to encrypted passwords and abandon nonencrypted
passwords if security is an issue. Section 9.4 of this chapter
explains how to use encrypted as well as nonencrypted passwords.
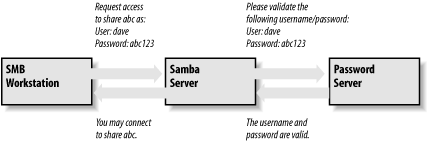
Server-Level Security
Server-level
security is similar to user-level security.
However, with server-level security, Samba delegates password
authentication to another SMB password server—typically another
Samba server or a Windows NT/2000 server acting as a PDC on the
network. Note that Samba still maintains its list of shares and their
configuration in its smb.conf file. When a
client attempts to make a connection to a particular share, Samba
validates that the user is indeed authorized to connect to the share.
Samba then attempts to validate the password by passing the username
and password to the SMB password server. If the password is accepted,
a session is established with the client. See Figure 9-2 for an illustration of this setup.
Figure 9-2. A typical system setup using server-level security
You can configure Samba to use a separate password server under
server-level security with the use of the
password server
global configuration option, as follows:
[global]
    security = server
    password server = mixtec toltec
Note that you can specify more than one machine as the target of the
password server; Samba moves
down the list of servers in the event that its first choice is
unreachable. The servers identified by the
password server option are
given as NetBIOS names, not their DNS names or equivalent IP
addresses. Also, if any of the servers reject the given password, the
connection automatically fails—Samba will not attempt another
server.
One caveat: when using this option, you still need an account
representing that user on the regular Samba server. This is because
the Unix operating system needs a username to perform various I/O
operations. The preferable method of handling this is to give the
user an account on the Samba server but disable the
account's password by replacing it in the system
password file (e.g., /etc/passwd ) with an
asterisk (*).
Domain-Level Security
With domain-level
security, the Samba server acts as a member of
a Windows domain. Recall from Chapter 1 that each
domain has a primary domain controller, which can be a Windows
NT/2000 or Samba server offering password authentication. The domain
controller keeps track of users and passwords in its own database and
authenticates each user when she first logs on and wishes to access
another machine's shares.
As mentioned earlier in this chapter, Samba has a similar ability to
offer user-level security, but that option is Unix-centric and
assumes that the authentication occurs via Unix password files. If
the Unix machine is part of an NIS or NIS+ domain, Samba
authenticates users transparently against a shared password file in
typical Unix fashion. Samba then provides access to the NIS or NIS+
domain from Windows. There is, of course, no relationship between the
NIS concept of a domain and a Windows NT domain.
Configuring Samba for domain-level security is covered in Chapter 4 in Section 4.7.
Passwords
Passwords
are a thorny issue with Samba. So much so, in fact, that they are
often the first major problem that users encounter when they install
Samba. At this point, we need to delve deeper into Samba to discover
what is happening on the network.
Passwords sent from individual clients can be either encrypted or
nonencrypted. Encrypted passwords are, of course, more secure. A
nonencrypted, plain-text password can be easily read with a
packet-sniffing program, such as the modified
tcpdump program for Samba that we used in Chapter 1. Whether passwords are encrypted by default
depends on the operating system that the client is using to connect
to the Samba server. Table 9-5 lists which
Windows operating
systems encrypt their passwords and which send plain-text passwords
by default.
Table 9-5. Windows operating systems with encrypted passwords
|
Operating system
|
Encrypted or plain text
|
|
Windows for Workgroups
|
Plain text
|
|
Windows 95
|
Plain text
|
|
Windows 95 with SMB Update
|
Encrypted
|
|
Windows 98
|
Encrypted
|
|
Windows Me
|
Encrypted
|
|
Windows NT 3.x
|
Plain text
|
|
Windows NT 4.0 before SP 3
|
Plain text
|
|
Windows NT 4.0 after SP 3
|
Encrypted
|
|
Windows 2000
|
Encrypted
|
|
Windows XP
|
Encrypted
|
Three different encryption methods are used. Windows 95/98/Me clients
use a method inherited from Microsoft's LAN Manager
network software. Windows NT/2000/XP systems use a newer system,
called NT LAN Manager, or NTLM. A newer version of this (called NT
LAN Manager Version 2, or NTLMv2) uses a different method for
password hashing.
If encrypted passwords are supported, Samba stores the encrypted
passwords in a file called smbpasswd. By
default, this file is located in the private
directory of the Samba distribution (typically
/usr/local/samba/private). At the same time, the
client stores an encrypted version of a user's
password on its own system. The plain-text password is never stored
on either system. Each system encrypts the password automatically
using a standard algorithm when the password is set or changed.
When a client requests a connection to an SMB server that supports
encrypted passwords (such as Samba or Windows NT/2000/XP), the two
computers undergo the following negotiations:
-
The client attempts to negotiate a protocol with the server.
-
The server responds with a protocol and indicates that it supports
encrypted passwords. At this time, it sends back a randomly generated
8-byte challenge string.
-
The client uses the challenge string as a key to encrypt its already
encrypted password using an algorithm predefined by the negotiated
protocol. It then sends the result to the server.
-
The server does the same thing with the encrypted password stored in
its database. If the results match, the passwords are equivalent, and
the user is authenticated.
Note that even though the original passwords are not involved in the
authentication process, you need to be very careful that the
encrypted passwords located inside the smbpasswd
file are guarded from unauthorized users. If they are compromised, an
unauthorized user can break into the system by replaying the steps of
the previous algorithm. The encrypted passwords are just as sensitive
as the plain-text passwords—this is known as
plain-text-equivalent data in the cryptography
world. Of course, your local security policy should require that the
clients safeguard their plain-text-equivalent passwords as well.
You can configure Samba to accept encrypted passwords with the
following global additions to smb.conf. Note
that we explicitly name the location of the Samba password file:
[global]
    security = user
    encrypt passwords = yes
    smb passwd file = /usr/local/samba/private/smbpasswd
Samba, however, will not accept any users until the
smbpasswd file has been created and the users
have been added to it with the smbpasswd
command, as we showed you in Chapter 2.
Disabling Encrypted Passwords on the Client
While Unix authentication has been
in use for decades—including the use of
telnet and rlogin access
across the Internet—it embodies well-known security risks.
Plaintext passwords are sent over the Internet and can be retrieved
from TCP packets by malicious snoopers. However, if you feel that
your network is secure and you wish to use standard Unix
/etc/passwd authentication for all clients, you
can do so, but you must disable encrypted passwords on those Windows
clients that default to using them.
To do this, you must modify the Windows registry on each client
system. The Samba distribution includes the .reg
files you need for this, located in the source
distribution's /docs/Registry
directory. Depending on the platform, you use one of the following
files:
Win95_PlainPassword.reg
Win98_PlainPassword.reg
WinME_PlainPassword.reg
NT_PlainPassword.reg
Win2000_PlainPassword.reg
(For Windows XP, use the .reg file for Windows
2000.) You can perform the installation by copying the appropriate
.reg file to a DOS floppy, inserting the floppy
in the client's floppy drive, and running the
.reg file from the Run menu item in the
client's Start menu. (Or you can just double-click
the file's icon.)
After you reboot the machine, the client will not encrypt its hashed
passwords before sending them to the server. This means that the
plain-text passwords can been seen in the TCP packets that are
broadcast across the network. Again, we encourage you not to do this
unless you are absolutely sure that your network is secure.
If passwords are not encrypted, use these two lines in your Samba
configuration file:
[global]
    security = user
    encrypt passwords = no
The smbpasswd File
Samba stores its encrypted passwords in a file called
smbpasswd,
which by default resides in the
/usr/local/samba/private directory. The
smbpasswd file should be guarded as closely as
the Unix system's password file (either
/etc/passwd or
/etc/shadow). Only the root user should have
read/write access to the private directory, and
no other users should have access to it at all. In addition, the
smbpasswd file should have all access denied to
all users except for root. When things are set up for good security,
long listings of the private directory and
smbpasswd file look like the following:
# ls -ld /usr/local/samba/private
drwx- - - - - -   2 root   root   4096 Nov 26 01:11 /usr/local/samba/private
# ls -l /usr/local/samba/private/smbpasswd
-rw- - - - - - -   1 root   root    204 Nov 26 01:11 /usr/local/samba/private/smbpasswd
Before you can use encrypted passwords, you need to create an entry
for each Unix user in the smbpasswd file. The
structure of the file is somewhat similar to a Unix
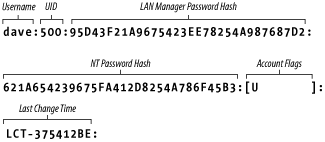
passwd file, but has different fields. Figure 9-3 illustrates the layout of the
smbpasswd file; the entry shown is actually one
line in the file.
Figure 9-3. Structure of the smbpasswd file entry (actually one line)
Normally, entries in the smbpasswd file are
created automatically by the smbpasswd command.
Still, you might like to know how to interpret data within the
smbpasswd file, in case you'd
like to see what accounts are stored in it or even modify it
manually. Here is a breakdown of the individual fields:
- Username
-
This is the username of the account. It is taken directly from the
system password file.
- UID
-
This is the user ID (UID) of the account. Like the username, it is
taken directly from the system password file and must match the UID
there.
- LAN Manager Password Hash
-
This is a 32-bit hexadecimal sequence that represents the password
Windows 95/98/Me clients will use. It is derived by splitting the
password into two 7-character strings, with all lowercase letters
forced into uppercase. If fewer than 14 characters are in the
password, the strings are padded with nulls. Then each 7-character
string is converted to a 56-bit DES key and used to encrypt the
constant string KGS!@#$%. The two 64-bit results
are concatenated and stored as the password hash.
If there is currently no password for the user, the first 11
characters of the hash will consist of the sequence
NO PASSWORD followed by
X characters for the remainder. If the password
has been disabled, it will consist of 32 X
characters.
- NT LAN Manager (NTLM) Password Hash
-
This is a 32-bit hexadecimal sequence that represents the password
Windows NT/2000/XP clients will use. It is derived by hashing the
user's password (represented as a 16-bit
little-endian Unicode sequence) with an MD4 hash. The password is not
converted to uppercase letters first.
- Account Flags
-
This field consists of 11 characters between two braces ( [ ] ). Any
of the following characters can appear in any order; the remaining
characters should be spaces:
- U
-
This account is a standard user account.
- D
-
This account is currently disabled, and Samba should not allow any
logins.
- N
-
This account has no password associated with it.
- W
-
This is a workstation trust account that can be used to configure
Samba as a PDC when allowing Windows NT machines to join its domain.
- Last Change Time
-
This code consists of the characters LCT- followed
by a hexadecimal representation of the number of seconds since the
epoch (midnight on January 1, 1970) that the entry was last changed.
Password Synchronization
Having a regular password (either in
/etc/passwd or /etc/shadow)
and an encrypted version of the same password (in the
smbpasswd file) can be troublesome when you need
to change both of them. Luckily, Samba affords you a limited ability
to keep your passwords synchronized. Samba has a pair of
configuration options to update a user's regular
Unix password automatically when the encrypted password is changed on
the system. The feature can be activated by specifying the
unix password
sync global configuration option:
[global]
    unix password sync = yes
With this option enabled, Samba attempts to change the
user's regular password (as root)
when the encrypted version is changed with
smbpasswd. However, two other options have to be
set correctly for this to work.
The easier of the two is passwd
program. This option simply specifies the Unix
command used to change a user's standard system
password. It is set to /bin/passwd
%u by default. With some Unix systems, this is
sufficient, and you do not need to change anything. Others, such as
Red Hat Linux, use /usr/bin/passwd instead. In
addition, you might want to change this to another program or script
at some point in the future. For example, let's
assume that you want to use a script called
changepass to change a user's
password. Recall that you can use the variable %u
to represent the current Unix username. So the example becomes:
[global]
    unix password sync = yes
    passwd program = changepass %u
Note that this program is called as the root user
when the unix password
sync option is set to yes. This
is because Samba does not necessarily have the old plain-text
password of the user.
The harder option to configure is
passwd chat. The
passwd chat option works like a
Unix chat script. It specifies a series of strings to send, as well
as responses to expect from the program specified by the
passwd program option. For
example, this is what the default passwd
chat looks like. The delimiters are the spaces
between each grouping of characters:
passwd chat = *old*password* %o\n *new*password* %n\n *new*password* %n\n *changed*
The first grouping represents a response expected from the
password-changing program. Note that it can contain wildcards
(*), which help to generalize the chat programs to
handle a variety of similar outputs. Here,
*old*password* indicates that Samba is expecting
any line from the password program containing the letters
old followed by the letters
password, without regard for what comes before,
after, or between them. If Samba does not receive the expected
response, the password change will fail.
The second grouping indicates what Samba should send back once the
data in the first grouping has been matched. In this case, you see
%o\n. This response is actually two items: the
variable %o represents the old password, while the
\n is a newline character. So, in effect, this
will "type" the old password into
the standard input of the password-changing program, and then
"press" Enter.
Following that is another response grouping, followed by data that
will be sent back to the password-changing program. (In fact, this
response/send pattern continues indefinitely in any standard Unix
chat script.) The script continues until the
final pattern is matched.
You can help match the response strings sent from the password
program with the characters listed in Table 9-6.
In addition, you can use the characters listed in Table 9-7 to help formulate your response.
Table 9-6. Password chat response characters
|
Character
|
Definition
|
|
*
|
Zero or more occurrences of any character.
|
|
" "
|
Allows you to include matching strings that contain spaces. Asterisks
are still considered wildcards even inside of quotes, and you can
represent a null response with empty quotes.
|
Table 9-7. Password chat send characters
|
Character
|
Definition
|
|
%o
|
The user's old password
|
|
%n
|
The user's new password
|
|
\n
|
The linefeed character
|
|
\r
|
The carriage-return character
|
|
\t
|
The tab character
|
|
\s
|
A space
|
For example, you might want to change your password chat to the
following entry. This handles scenarios in which you do not have to
enter the old password. In addition, this also handles the new
all tokens
updated successfully string
that Red Hat Linux sends:
passwd chat = *New password* %n\n *new password* %n\n *success*
Again, the default chat should be sufficient for many Unix systems.
If it isn't, you can use the
passwd chat
debug global option to set up a new chat script
for the password change program. The passwd
chat debug option logs
everything during a password chat. This option is a simple Boolean,
as shown here:
[global]
    unix password sync = yes
    passwd chat debug = yes
    log level = 100
After you activate the password chat debug feature, all I/O received
by Samba through the password chat can be sent to the
log.smbd Samba log file with a debug level of
100, which is why we entered a new log
level option as well. As this can often generate
multitudes of error logs, it can be more efficient to use your own
script—by setting the passwd
program option—in place of
/bin/passwd to record what happens during the
exchange. Be careful because the log file contains the passwords in
plain text. Keeping files containing plain-text passwords can (or
should) be against local security policy in your
organization, and it also might raise serious legal issues. Make sure
to protect your log files with strict file permissions and to delete
them as soon as you've grabbed the information you
need. If possible, use the passwd
chat debug option only while
your own password is being changed.
The operating system on which Samba is running might have strict
requirements for valid passwords to make them more impervious to
dictionary attacks and the like. Users should be made aware of these
restrictions when changing their passwords.
Earlier we said that password synchronization is limited. This is
because there is no reverse synchronization of the encrypted
smbpasswd file when a standard Unix password is
updated by a user. There are various strategies to get around this,
including NIS and freely available implementations of the Pluggable
Authentication Modules (PAM) standard, but none of them really solves
all the problems.
More information regarding passwords can be found in the in the Samba
source distribution file
docs/htmldocs/ENCRYPTION.html.
Password Configuration Options
The options in Table 9-8 will help you work with passwords in Samba.
Table 9-8. Password configuration options
|
Option
|
Parameters
|
Function
|
Default
|
Scope
|
|
encrypt passwords
|
Boolean
|
If yes, enables encrypted passwords.
|
no
|
Global
|
|
unix password sync
|
Boolean
|
If yes, updates the standard Unix password
database when a user changes his encrypted password.
|
no
|
Global
|
|
passwd chat
|
string (chat commands)
|
Sequence of commands sent to the password program.
|
See earlier section on this option
|
Global
|
|
passwd chat debug
|
Boolean
|
If yes, sends debug logs of the password-change
process to the log files with a level of 100.
|
no
|
Global
|
|
passwd program
|
string (Unix command)
|
Program to be used to change passwords.
|
/bin/passwd %u
|
Global
|
|
password level
|
numeric
|
Number of capital-letter permutations to attempt when matching a
client's password.
|
None
|
Global
|
|
update encrypted
|
Boolean
|
If yes, updates the encrypted password file when a
client connects to a share with a plain-text password.
|
no
|
Global
|
|
null passwords
|
Boolean
|
If yes, allows access for users with null
passwords.
|
no
|
Global
|
|
smb passwd file
|
string (filename)
|
Name of the encrypted password file.
|
/usr/local/samba/private/smbpasswd
|
Global
|
|
hosts equiv
|
string (filename)
|
Name of a file that contains hosts and users that can connect without
using a password.
|
None
|
Global
|
|
use rhosts
|
string (filename)
|
Name of a .rhosts file that allows users to
connect without using a password.
|
None
|
Global
|
encrypt passwords
The encrypt
passwords global option switches Samba from using
plain-text passwords to encrypted passwords for authentication.
Encrypted passwords will be expected from clients if the option is
set to yes:
encrypt passwords = yes
In Samba 2.2.x versions and with previous versions, encrypted
passwords are disabled by default. This was changed in Samba 3.0 to
make encrypted passwords enabled by default.
If you use encrypted passwords, you must have a valid
smbpasswd file in place and populated with
usernames that authenticate with encrypted passwords. (See Section 9.4.2 earlier in
this chapter.) In addition, Samba must know the location of the
smbpasswd file; if it is not in the default
location (typically
/usr/local/samba/private/smbpasswd ), you can
explicitly name it using the smb
passwd file option.
If you wish, you can use update
encrypted to force Samba to update the
smbpasswd file with encrypted passwords each
time a client connects using a nonencrypted password.
If you have a mixture of clients on your network, with some of them
using encrypted passwords and others using plain-text passwords, you
can use the include option to make Samba treat
each client appropriately. To do this, create individual
configuration files based on the client name (%m).
These host-specific configuration files can contain an
encrypted passwords
= yes option that activates
only when those clients are connecting to the server.
unix password sync
The unix password
sync global option allows Samba to update the
standard Unix password file when a user changes her encrypted
password. The encrypted password is stored on a Samba server in the
smbpasswd file, which is located by default in
/usr/local/samba/private. You can activate this
feature as follows:
[global]
    unix password sync = yes
If this option is enabled, Samba changes the encrypted password and,
in addition, attempts to change the standard Unix password by passing
the username and new password to the program specified by the
passwd program option
(described earlier). Note that Samba does not necessarily have access
to the plain-text password for this user, so the password changing
program must be invoked as root.[2] If the Unix password change does not
succeed, for whatever reason, the SMB password is not changed either.
passwd chat
This option specifies a series of send/response strings similar to a
Unix chat script, which interface with the password-changing program
on the Samba server. Section 9.4.3 earlier in this
chapter covers this option in detail.
passwd chat debug
If set to yes, the
passwd chat
debug global option logs everything sent or
received by Samba during a password chat. All the I/O received by
Samba through the password chat is sent to the Samba logs with a
debug level of 100; you must specify log
level = 100
for the information to be recorded. Section 9.4.3 earlier in this
chapter describes this option in more detail. Be aware that if you do
set this option, the plain-text passwords will be visible in the
debugging logs, which could be a security hazard if they are not
properly secured. It is against the security policy of some
organizations for system administrators to have access to
users' passwords.
passwd program
The passwd
program option specifies a program on the Unix
Samba server that Samba can use to update the standard system
password file when the encrypted password file is updated. This
option defaults to the standard passwd program,
usually located in the /bin directory. The
%u variable is typically used as the requesting
user when the command is executed. The actual handling of input and
output to this program during execution is handled through the
passwd chat option. Section 9.4.3 earlier in this
chapter covers this option in detail.
password level
With SMB, nonencrypted (or plain-text) passwords are sent with
capital letters, just like the usernames mentioned previously. Many
Unix users, however, choose passwords with both upper- and lowercase
letters. Samba, by default, only attempts to match the password
entirely in lowercase letters and not capitalizing the first letter.
Like username level, a
password level option can be
used to attempt various permutations of the password with capital
letters. This option takes an integer value that specifies how many
letters in the password should be capitalized when attempting to
connect to a share. You can specify this option as follows:
[global]
    password level = 3
In this case, Samba then attempts all permutations of the password it
can compute having three capital letters. The larger the number, the
more computations Samba has to perform to match the password, and the
longer a connection to a specific share might take.
update encrypted
For sites switching over to the encrypted password format, Samba
provides an option that should help with the transition. The
update encrypted option allows
a site to ease into using encrypted passwords from plain-text
passwords. You can activate this option as follows:
[global]
    update encrypted = yes
This instructs Samba to create an encrypted version of each
user's Unix password in the
smbpasswd file each time she connects to a
share. When this option is enabled, you must have the
encrypt passwords option set to
no so that the client passes plain-text passwords
to Samba to update the files. Once each user has connected at least
once, you can set encrypted
passwords =
yes, allowing you to use only the encrypted
passwords. The user must already have a valid entry in the
smbpasswd file for this option to work.
null passwords
This global option tells Samba whether to allow access from users
that have null passwords (encrypted or nonencrypted) set in their
accounts. The default value is no. You can
override it as follows:
null passwords = yes
We highly recommend against doing so because of the security risks
this option can present to your system, including inadvertent access
to system users (such as bin) in the system
password file who have null passwords set.
smb passwd file
This global option identifies the location of the encrypted password
database. By default, it is set to
/usr/local/samba/private/smbpasswd. You can
override it as follows:
[global]
    smb passwd file = /etc/samba/smbpasswd
This location, for example, is common on many Red Hat distributions
on which Samba has been installed using an RPM package.
hosts equiv
This global option specifies the name of a standard Unix
hosts.equiv file that allows hosts or users to
access shares without specifying a password. You can specify the
location of such a file as follows:
[global]
    hosts equiv = /etc/hosts.equiv
The default value for this option does not specify any
hosts.equiv file. Because using a
hosts.equiv file is a huge security risk, we
strongly recommend against using this option.
use rhosts
This global option specifies the name of a standard Unix
user's .rhosts file that allows
foreign hosts to access shares without specifying a password. You can
specify the location of such a file as follows:
[global]
    use rhosts = /home/dave/.rhosts
The default value for this option does not specify any
.rhosts file. Like the hosts
equiv option discussed earlier, using such a file
is a security risk. We highly recommend that you do not use this
option unless you are confident in the security of your network.
Authentication with winbind
In Chapter 3, we
showed you how to add Windows clients to a network in which user
accounts were maintained on the Samba server. We added a user account
to the Windows client using the same username and password as an
account on the Unix system. This method works well in many computing
environments. However, if a Samba server is added to a Windows
network that already has a Windows NT/2000 primary domain controller,
the PDC has a preexisting database of user accounts and group
information that is used for authentication. It can be a big chore to
transfer that database manually to the Unix server, and later
maintain and synchronize the Unix and Windows databases.
In Chapter 4, we showed you how to add a Samba
server as a domain member server to a network having a Windows
NT/2000 primary domain controller. We set security
= domain in the Samba
configuration file to have the Samba server hand off authentication
to the Windows PDC. Using that method, passwords are kept only on the
PDC, but it is still necessary to set up user accounts on the Unix
side to make sure each client has a valid Unix UID and group ID
(GID). This is necessary for maintaining the file ownerships and
permissions of the Unix security model. Whenever Samba performs an
operation on the Unix filesystem on behalf of the Windows client, the
user must have a valid UID and GID on the local Unix system.
A facility that has recently been added to Samba, winbind, allows the
Windows PDC to handle
not only authentication, but the user and group information as well.
Winbind works by extending the Unix user and group databases beyond
the standard /etc/passwd and
/etc/group files such that users and groups on
the Windows PDC also exist as valid users and groups on the Unix
system. The extension applies to the entire Unix system and allows
users who are members of a Windows domain to perform any action on
the Unix system that a local user would, including logging in to the
Unix system by telnet or even on the local
system, using their domain usernames and passwords.
When winbind is in use, administration of user accounts can be done
on the Windows PDC, without having to repeat the tasks on the Unix
side. This includes password expiration and allowing users to change
their passwords, which would otherwise not be practical. Aside from
simplifying domain administration and being a great time saver,
winbind lets Samba be used in computing environments where it
otherwise might not be allowed.
WARNING
Because this is a chapter on security, we want to point out that some
issues might relate to allowing a Windows system to authenticate
users accessing a Unix system! Whatever you might think of the
relative merits of Unix and Windows security models (and even more
importantly, their implementations), one thing
is certain: adding winbind support to your Samba server greatly
complicates the authentication system overall—and quite
possibly allows more opportunities for crackers.
We present winbind in this chapter not as a means of improving
security, but rather as a further example of Samba's
ability to integrate itself into a modern Windows environment.
Installing winbind
Installing
and configuring winbind is fairly complicated and involves the
following steps:
-
Reconfigure, recompile, and reinstall Samba—to add support for
winbind.
-
Configure the Unix name server switch.
-
Modify the Samba configuration file.
-
Start and test the winbindd daemon.
-
Configure the system to start and stop the
winbindd daemon automatically.
-
Optionally, configure PAM for use with winbind.
At the time this book was written, winbind was supported only on
Linux, so all of the following directions are specific to it. Other
Unix flavors might be supported at a later time. In addition, we
assume you have a Windows NT/2000 primary domain controller running
on your network.
First, you will need to configure and compile Samba using the
--with-winbind configure option. Directions for
doing this are included in Chapter 2 in Section 2.3. As usual, run
make install to reinstall the Samba binaries.
Configuring nsswitch
When
Samba is compiled after being configured with the
--with-winbind option, the compilation process
produces a library called
libnss_winbind.so in the
source/nsswitch directory. This library needs to
be copied to the /lib directory:
# cp nsswitch/libnss_winbind.so /lib
Also, a symbolic link must be created for winbind to be fully
functional:
# ln -s /lib/libnss_winbind.so /lib/libnss_winbind.so.2
TIP
The name of this symbolic link is correct for Samba 2.2.3 and Red Hat
7.1. The name might change—with a higher version number in the
extension—in future releases. See the
winbindd manual page for details.
Next, we need to modify /etc/nsswitch.conf to
make the lines for passwd and
group look like this:
passwd:     files winbind
group:      files winbind
Then activate these changes by issuing the following command:
# /sbin/ldconfig
What we've just done is reconfigure the Linux name
service switch, which allows name service and other tasks to be
configured to use the traditional method (files in the
/etc directory) or an extension coded in a
library, such as the libnss_winbind.so library
we've just installed. We've
specified in our configuration that Samba will search for user and
group information first in the /etc/passwd and
/etc/group files, and if they are not found
there, in the winbind service.
Modifying smb.conf
To use winbind, we must have our Samba
server added to the Windows NT domain as a domain member server (as
we described in Chapter 4) and also add some
parameters to the Samba configuration file to configure winbind. In
addition to the options required to configure Samba as a domain
member server, we need:
[global]
    winbind uid = 10000-20000
    winbind gid = 10000-20000
The winbind uid and
winbind gid options tell
winbind how to map between Windows relative identifiers (RIDs) and
Unix UIDs and GIDs. Windows uses RIDs to identify users and groups
within the domain, and to function, the Unix system must have a UID
and GID associated with every user and group RID that is received
from the Windows primary domain controller. The
winbind uid and
winbind gid parameters simply
provide winbind with a range of UIDs and GIDs, respectively, that are
allocated by the system administrator for Windows NT domain users and
groups. You can use whatever range you want for each; just make sure
the lowest number in the range does not conflict with any entries in
your /etc/passwd or
/etc/group files at any time, either now or in
the future. It is important to be conservative about this. Once
winbind adds an RID to UID/GID mapping to its database, it is very
difficult to modify the mapping.
WARNING
The file
/usr/local/samba/locks/winbindd_idmap.tdb
contains winbind's RID mapping file by default. We
suggest you regard this file as extremely sensitive and make sure to
guard it carefully against any kind of harm or loss. If you lose it,
you will have to re-create it manually, which can be a very
labor-intensive task.
WARNING
Be careful when adding local users after domain users have started
accessing the Samba server. The domain users will have entries
created for them by winbind in /etc/passwd, with
UIDs in the range you specify. If you are using a method of creating
new accounts that automatically assigns UIDs, it might choose UIDs by
adding 1 to the highest UID assigned thus far, which will be the most
recent UID added by winbind. (This is the case on Red Hat Linux, with
the useradd script, for example.) The UID for
the new local user will be within the range allocated for winbind,
which will have undesired effects. Make sure to add new local users
using a method that assigns them UIDs in the proper range. For
example, you can use the -u option of
useradd to specify the UID to assign to the new
user.
Restart the Samba daemons to put your changes to the configuration
file into effect. If you have not already done so while adding your
Samba server as a domain member server, you must issue the command:
# smbpasswd -j domain -r pdc -U Administrator
as we described in Chapter 4. At this point, you
can start the winbindd daemon:
# winbindd
You might want to
run a ps ax command to see that the
winbindd daemon is running. Now, to make sure
everything we've done up to this point works, we can
use Samba's wbinfo command:
$ wbinfo -u
METRAN\Administrator
METRAN\bebe
METRAN\Guest
METRAN\jay
METRAN\linda
$ wbinfo -g
METRAN\Domain Admins
METRAN\Domain Guests
METRAN\Domain Users
The -u option queries the domain controller for
a list of domain users, and the -g option asks
for the list of groups. The output shows that the Samba host system
can query the Windows PDC through winbind.
Another thing to check is the list of users and groups, using the
getent command:
# getent passwd
root:x:0:0:root:/root:/bin/bash
bin:x:1:1:bin:/bin:
daemon:x:2:2:daemon:/sbin:
    ... deleted ...
jay:x:500:500:Jay Ts:/home/jay:/bin/bash
rik:x:501:501::/home/rik:/bin/bash
METRAN\Administrator:x:10000:10000::/home/METRAN/administrator:/bin/bash
METRAN\bebe:x:10001:10000:Bebe Larta:/home/METRAN/bebe:/bin/bash
METRAN\Guest:x:10002:10000::/home/METRAN/guest:/bin/bash
METRAN\jay:x:10003:10000:Jay Ts:/home/METRAN/jay:/bin/bash
METRAN\linda:x:10004:10000:Linda Lewis:/home/METRAN/linda:/bin/bash

# getent group
root:x:0:root
bin:x:1:root,bin,daemon
daemon:x:2:root,bin,daemon
    ... deleted ...
jay:x:500:
rik:x:501:
METRAN\Domain Admins:x:10001:METRAN\Administrator
METRAN\Domain Guests:x:10002:METRAN\Guest
METRAN\Domain Users:x:10000:METRAN\Administrator,METRAN\jay,METRAN\linda,METRAN\bebe
This shows that the Linux system is finding the domain users and
groups through winbind, in addition to those in the
/etc/passwd and /etc/group
files. If this part doesn't work as shown earlier,
with the domain users and groups listed after the local ones, check
to make sure you made the symbolic link to
libnss_winbind.so in /lib
correctly.
Now you can try connecting to a Samba share from a Windows system
using a domain account. You can either log on to the domain from a
Windows NT/2000/XP workstation or use smbclient
with the -U option to specify a username.
NOTE
If you get errors while attempting to log on to the domain, it is
probably because you had previously configured the client system with
a computer account on another domain controller. Commonly, you get a
dialog box that says, "The domain
NAME is not available."
On a Windows 2000 system, the fix is to log in to the system as an
administrative user and open the Control Panel, double-click the
System icon, click the Network Identification tab, then click the
Properties button. In the dialog that comes up, click the
"Workgroup:" radio button and fill
in the name of the workgroup (you can use the same name as the
domain). Click the OK buttons in the dialogs, and reboot if
requested.
This removes the computer account from the primary domain controller.
Now log in again as the administrative user and repeat the previous
directions, but change from the workgroup back to the domain. This
creates a new computer account that
"fits" the workstation to the new
primary domain controller. If your network has backup domain
controllers, it will take up to 15 minutes for the new computer
account to propagate to the BDCs.
If you are using Windows NT/XP, the method is slightly different. For
the exact procedure, see the section in Chapter 4
that is specific to your Windows version.
After logging in as a domain user, try creating a file or two in a
Samba share. (You might need to change the permissions on the shared
directory—say, to 777—to allow this access. This is very
permissive, but after you finish reading this section, you will
understand how to change ownership and permissions on the directory
to restrict access to selected domain users.) After
you've created files by one or more domain users,
take a look at the directory's contents from a Linux
shell. You will see something like this:
$ ls -l /u
-rwxrw-rw-    1 METRAN\b METRAN\D        0 Apr 13 00:00 bebes-file.doc
-rwxrw-rw-    1 METRAN\l METRAN\D        0 Apr 12 23:58 lindas-file.doc
drwxrwxr-x    6 jay      jay          4096 Jan 15 05:12 snd
$ ls -ln /u
total 4
-rwxrw-rw-    1 10001    10000           0 Apr 13 00:00 bebes-file.doc
-rwxrw-rw-    1 10004    10000           0 Apr 12 23:58 lindas-file.doc
drwxrwxr-x    6 500      500          4096 Jan 15 05:12 snd
We can even use the domain usernames and groups from the Linux shell:
# chown 'METRAN\linda:METRAN\Domain Users' /u
# ls -ldu /u
drwxrwxrwx    3 METRAN\l METRAN\D     4096 Apr 13 00:44 /u
# ls -ldn /u
drwxrwxrwx    3 10004    10000        4096 Apr 13 00:00 /u
Notice how the owner and group are listed as being those of the
domain user and group. Unfortunately, the GNU ls
command won't show the full names of the domain
users and groups, but we can use the -ln listing
to show the UIDs and GIDs and then translate with the
wbinfo command:
$ wbinfo -s `wbinfo -U 10004`
METRAN\LINDA 1
$ wbinfo -s `wbinfo -G 10000`
METRAN\Domain Users 2
(It's a bit messy, but it works, and it shows that
the winbind system is working!) At this point, you might want to
modify your /etc/rc.d/init.d/smb script to start
and stop the winbindd daemon automatically along
with the smbd and nmbd
daemons. Starting with the script we presented in Chapter 2, we first add this code to the
start( ) function:
echo -n $"Starting WINBIND services: "
/usr/local/samba/bin/winbindd
ERROR2=$?
if [ $ERROR2 -ne 0 ]
then
    ERROR=1
fi
echo
The previous code should be located after the code that starts
nmbd and before the return
statement.
TIP
We start winbindd after
nmbd because winbindd needs
nmbd to be running to work properly.
In the stop( ) function, we add the following:
echo -n $"Shutting down WINBIND services: "
/bin/kill -TERM -a winbindd
ERROR2=$?
if [ $ERROR2 -ne 0 ]
then
    ERROR=1
fi
echo
Again, this code should be located after the code that stops
nmbd and before the return
statement.
Configuring PAM
Most
popular Linux distributions use Pluggable
Authentication Modules (PAM), a suite of shared libraries that
provide a centralized source of authentication for applications
running on the Unix system. PAM can be configured differently for
each application (or service) that uses it, without needing to
recompile the application. As a hypothetical example, if an
organization's security policy mandated the use of
passwords exactly 10 characters in length, a PAM module could be
written to check the length of passwords submitted by users and
reject any attempts to use a longer or shorter password. PAM would
then be reconfigured to include the new module for services such as
ftp, console login, and GUI login that call upon
PAM to authenticate users.
If you are not already familiar with PAM, we suggest you read the
documentation provided with the Linux PAM package before continuing.
On most Linux systems, it is located in the
/usr/share/doc directory hierarchy. Another
resource is the Linux-PAM System
Administrator's
Guide, which you can find
on the Internet at http://www.kernel.org/pub/linux/libs/pam.
The rest of this section is about using the PAM module provided in
the Samba distribution to enable Windows domain users to authenticate
on the Linux system hosting Samba. Depending on which services you
choose to configure, this allows Windows domain users to log in on a
local console (or through telnet), log in to a
GUI desktop on the Linux system, authenticate with an FTP server
running on the Linux system, or use other services normally limited
to users who have an account on the Linux system. The PAM module
authenticates Windows domain users by querying winbind, which passes
the authentication off to a Windows NT domain controller.
As an example, we will show how to allow Windows domain users to log
in to a text console on the Linux system and get a command shell and
home directory. The method used in our example can be applied (with
variations) to other services.
All users who can log in to the Linux system need a shell and a home
directory. Unix and Linux keep this user information in the password
file (/etc/passwd ), but information about
Windows users isn't located there. Instead, in the
Samba configuration file, we add the following to notify winbind what
the shell and home directory for Windows domain users will be:
[global]
    template shell = /bin/bash
    template homedir = /home/%D/%U
The first line sets the
template shell
parameter, which tells winbind what shell to use for domain users
that are logging in to the Unix host. The
template
homedir parameter specifies the location of
users' home directories. The %D
variable is replaced by the name of the domain in which the
user's account resides, and %U is
replaced by the user's username in that domain.
Before the domain users can successfully log in, their home
directories must be created manually. To add a single account for
linda in the METRAN domain, we would use these
commands:
# mkdir /home/METRAN
# chmod 755 /home/METRAN

# mkdir /home/METRAN/linda
# chown 'METRAN\linda:METRAN\Domain Users' /home/METRAN/linda
# chmod 700 /home/METRAN/linda
WARNING
One side effect of creating the home directories is that if the Samba
server is configured with a [homes] share, the
domain users can see and access their home directories through
Samba's file sharing.
Next, we need to compile and install the PAM module in the Samba
distribution. From the source directory in the Samba distribution,
issue the following commands:
# make nsswitch/pam_winbind.so
# cp nsswitch/pam_winbind.so /lib/security
and check that it was copied over correctly:
# ls /lib/security/pam_winbind.so
/lib/security/pam_winbind.so
On Red Hat Linux, the PAM configuration files reside in
/etc/pam.d. Before making any modifications, we
strongly advise making a backup of this directory:
# cp -pR /etc/pam.d /etc/pam.d.backup
The reason for this is that we will be modifying the Linux
system's means of authenticating logins, and if our
configuration goes awry, all users (including
root) will be locked out of the system. In case
the worst happens, we would reboot into single-user mode (by typing
linux single at the LILO:
prompt) or boot a rescue disk, and then we would issue these two
commands:
# mv /etc/pam.d /etc/pam.d.bad
# mv /etc/pam.d.backup /etc/pam.d
Be very careful to make sure you can recover from any errors you make
because when PAM encounters any configuration information it
doesn't understand, its action is not to allow
access. This means you must be sure to enter everything correctly!
You might want to leave yourself logged in as root on a spare virtual
terminal while you are modifying your PAM configuration to ensure
yourself a means of easy recovery.
In the /etc/pam.d directory, you will encounter
a file for each service that uses PAM. We are interested only in the
file corresponding to the login service, which is called
login. It contains the following lines:
auth       required     /lib/security/pam_securetty.so
auth       required     /lib/security/pam_stack.so service=system-auth
auth       required     /lib/security/pam_nologin.so
account    required     /lib/security/pam_stack.so service=system-auth
password   required     /lib/security/pam_stack.so service=system-auth
session    required     /lib/security/pam_stack.so service=system-auth
session    optional     /lib/security/pam_console.so
The lines starting with auth are related to the
function of authentication—that is, printing a password prompt,
accepting the password, verifying that it is correct, and matching
the user to a valid user and group ID. The line starting with
account is for account management, which allows
access to be controlled by other factors, such as what times during
the day a user is allowed access. We are not concerned with the lines
starting with password or
session because winbind does not add to either of
those functions.
The third column lists the PAM module, possibly with arguments, that
is called in for the task. The
pam_stack.so module has been added by Red Hat to act
somewhat like a macro or a subroutine. It calls the file in the
pam.d directory named by the service argument.
In this case, the file /etc/pam.d/system-auth
contains a common set of lines that are used as a default for many
services. Because we want to customize the login service for winbind,
we first replace the pam_stack.so lines for
auth and account with the
auth and account lines from
/etc/pam.d/system-auth. This yields:
auth       required     /lib/security/pam_securetty.so
auth       required     /lib/security/pam_env.so
auth       sufficient   /lib/security/pam_unix.so likeauth nullok
auth       required     /lib/security/pam_deny.so
auth       required     /lib/security/pam_nologin.so
account    required     /lib/security/pam_unix.so
password   required     /lib/security/pam_stack.so service=system-auth
session    required     /lib/security/pam_stack.so service=system-auth
session    optional     /lib/security/pam_console.so
To add winbind support, we need to add a line in both the
auth and account sections to
call the
pam_winbind.so module:
auth       required     /lib/security/pam_securetty.so
auth       required     /lib/security/pam_env.so
auth       sufficient   /lib/security/pam_winbind.so
auth       sufficient   /lib/security/pam_unix.so use_first_pass likeauth nullok
auth       required     /lib/security/pam_deny.so
auth       required     /lib/security/pam_nologin.so
account    sufficient   /lib/security/pam_winbind.so
account    required     /lib/security/pam_unix.so
password   required     /lib/security/pam_stack.so service=system-auth
session    required     /lib/security/pam_stack.so service=system-auth
session    optional     /lib/security/pam_console.so
The keywords required and
sufficient in the second column are significant.
The keyword required specifies that the result
returned by the module (either to pass or fail the authentication)
must be taken into account, whereas the keyword
sufficient specifies that if the module
successfully authenticates the user, no further lines need to be
processed. By specifying sufficient for the
pam_winbind.so module, we let winbind attempt to
authenticate users, and if it succeeds, the PAM system returns to the
application. If the pam_winbind.so module
doesn't find the user or the password does not
match, the PAM system continues with the next line, which performs
authentication according to the usual Linux user authentication. This
way, both domain users and local users can log in.
Notice that we also added the use_first_pass
argument to the pam_unix.so module in the
auth section. By default, both the
pam_winbind.so and
pam_unix.so modules print a password prompt and
accept a password. In cases where users are logging in to the Linux
system using their local accounts, this would require them to enter
their password twice. The user_first_pass argument
tells the pam_unix.so module to reuse the
password that was given to the pam_winbind.so
module, which results in users having to enter the password only
once.
After modifying the login configuration file,
switch to a spare virtual console and make sure you can still log in
using a regular Linux account. If not, check your modifications
carefully and try again until you get it right. Then log in using a
domain user account from the Windows PDC database to check that the
winbind authentication works. You will need to specify the username
in DOMAIN\user
format, like this:
login: METRAN\linda
Password:
More information on configuring winbind can be found in the Samba
source distribution file
docs/htmldocs/winbind.html, and in the
winbindd manual page. If you would like to learn
more about configuring PAM, we recommend the web page http://www.kernel.org/pub/linux/libs/pam/ as
a starting place. Some of the documentation for Linux PAM, including
Red Hat's extensions, can also be found on Red Hat
Linux in
/usr/share/doc/pam-version.
winbind Configuration Options
Table 9-9 summarizes some commonly used options
that you can use to configure winbind.
Table 9-9. winbind options
|
Option
|
Parameters
|
Function
|
Default
|
Scope
|
|
winbind separator
|
string (single character)
|
Character to use as a separator in domain usernames and group names
|
Backslash (\)
|
Global
|
|
winbind uid
|
string (numeric range)
|
Range of UIDs for RID-to-UID mapping
|
None
|
Global
|
|
winbind gid
|
string (numeric range)
|
Range of GIDs for RID-to-GID mapping
|
None
|
Global
|
|
winbind cache time
|
numeric
|
Number of seconds the winbindd daemon caches
user and group data
|
15
|
Global
|
|
template homedir
|
string (directory name)
|
Directory to be used as the home directory of the logged-in domain
user
|
/home/%D/%U
|
Global
|
|
template shell
|
string (command name)
|
The program to use as the logged-in domain user's
shell
|
/bin/false
|
Global
|
winbind separator
On Windows systems, the backslash (\) is commonly
used as a separator in file names, UNCs, and the names of domain
users and groups. For example, an account in the METRAN domain with a
username of linda would be written as
METRAN\linda. On Unix systems, the backslash is
commonly used as a metacharacter for quoting, so the account would
have to be specified as METRAN\\linda or
'METRAN\linda'. The winbind separator parameter
allows another character to be used instead of the backslash
character, making it much easier to type in domain user and group
names. For example, with:
[global]
    winbind separator = +
the aforementioned account could be written simply as
METRAN+linda on the Unix host, making it
unnecessary to use additional backslashes or single quotes. Winbind
then uses the same format for reporting domain user and group names.
winbind uid
As part of winbindd 's task of
letting Windows NT domain users function as local users on the Unix
host, winbindd supplies a Unix UID that is
linked to the Windows RID of the domain user. The
winbind uid parameter allows
the Unix system administrator to allocate a range of UIDs for this
purpose. It is very important that this range not overlap any UIDs
used for other purposes on the Unix system, so we recommend you begin
your range at a very high number, one much larger than the number of
local users and NIS users that will ever exist. For example,
winbind uid might be defined
as:
[global]
    winbind uid = 10000-15000
on a system that would never have more than 9,999 local and NIS
users, or for that matter, any other entries in
/etc/passwd that would use up another UID.
Because the example allocates 5,000 UIDs to
winbindd, the assumption is that there will
never be more than 5,000 domain users accessing the Samba host.
If your method for adding new local users to the system assigns UIDs
automatically, make sure it does not assign them within the range of
UIDs allocated to winbind. This might happen if the algorithm used
adds 1 to the highest UID assigned thus far.
There is no default for winbind
uid, so you must specify it in your Samba
configuration file for winbind to work.
winbind gid
This option works like winbind
uid, except that it is for allocating a range of
GIDs for use with winbindd. You might not need
to allocate as many GIDs as UIDs because you probably have relatively
few domain groups that need corresponding GIDs. (In many cases, users
are all members of the Domain Users group, requiring only one GID.)
However, it is best to play it safe, so make sure to allocate many
more GIDs than you think you will need.
As with winbind uid, if you are
using a method of adding new local users to your Unix host that
automatically assigns GIDs, either make sure the method used
doesn't conflict with winbind or set the GIDs
manually.
There is no default for winbind
gid, so you must specify it in your Samba
configuration file for winbind to work.
winbind cache time
The winbindd daemon maintains a cache of user
and group data that has been retrieved from the Windows PDC to reduce
network queries and increase performance. The
winbind cache
time parameter allows the amount of time (in
seconds) winbindd can use the cached data before
querying the PDC to check for an update. By default, this interval is
set to 15 seconds. This means that when any part of a user or group
account on the PDC is modified, it can take up to 15 seconds for
winbindd to update its own database.
template homedir
When the local Unix system is configured to allow domain users to log
in, the user must be provided with a home directory for many
programs, including command shells, to function properly. The
template homedir option is used
to set the name of the home directory. In the name of the directory,
%D is replaced by the name of the Windows NT
domain the user is in, and %U is replaced by his
username. By default, template
homedir is set to /home/%D/%U,
which works fine for a network in which there might be more than one
Windows NT domain, and it is possible for different people in
different domains to have the same username. If you are sure you will
never have more than one Windows NT domain on your network, or you
have more than one domain but know for sure that unique users have
identical usernames in each multiple domain, you might prefer to set
template homedir like this:
[global]
    template homedir = /home/%U
template shell
This option specifies the program to use as the shell for domain
users who are logged in to the Unix host. By default, it is set to
/bin/false, which effectively denies domain
users to log in. If you wish to allow logins for domain users, set
template shell to a valid
command shell (or other program) that you want to act as the textual
interface the domain users will receive when logged in. A common
setting on Linux would be:
[global]
    template shell = /bin/bash
which would give users the Bash shell for their interactive login
sessions.